The main fuel tanks are installed in the wings between the spars. There is a compartment that the aluminum fuel tank fits into, and the wing plywood skins have a cutout so that the top of the fuel tank compartment is open. To keep the wing surface smooth, there is a separate plywood cover plate that fits over the fuel tank and flushes up against the wing plywood at the edges.
As installed by the factory, the fuel tank cover skins are screwed down and the seams are blended into the wing surface with some putty. The tank cover seams are then covered with extra fabric tapes. Unfortunately wing flexing causes the seams to pop up and the tapes to wrinkle or possibly pop off in almost every Bellanca I've seen.
This occurred on the left fuel tank plug on my airplane about 200 hours after the cover job. I had noticed a bubble under the tape but it didn't appear to be growing. Then one day I was flying along and a thunk occurred. Oh shit. Check that the door didn't pop open, nope, it is secure and there's no wind whirring in the cabin.
There's ongoing vibration that feels like it is coming from the left wing root. I looked out the window at the left wing and noticed that parts of the tank cover tapes had completely ripped off, and there was a piece of tape that didn't completely let go flapping in the breeze. Needless to say I landed quickly.
The fix is not very hard if you have fabric experience, but it is messy. I made a fix that did not involve removing any of the wing fabric or the tank covers, rather I just replaced the tapes that ripped off. Start by masking off the wing and the remainder of the airplane. Spraying is necessary to fix this problem and if you don't mask the entire plane you're going to end up with paint speckles on your finish.
Strip off the old tape bits and get out the sandpaper to remove old filler and ridges. If there are any holes that have opened up then apply filler and sand some more. Since I wanted the repair to blend in, I also sanded up into the paint over the wing skin fabric to establish a chamfered edge. Where the tapes ripped off there was a hard edge of paint that had to be removed. When sanding on the wing skin fabric be very careful not to cut into the fabric itself.
My plane is covered with Poly Fiber so I followed the instructions in the Poly Fiber manual on bonding fabric to plywood surfaces: prep the surface with two coats of Poly-brush, then bond on the tapes using more Poly-brush. I applied two layers of tape, one narrow one in the middle of the seam and then a wider tape on top that covered the entire width of the repair. The top tapes should overlap onto the wing skin fabric.
Once the tapes are down and the mass of Poly-goo has some time to set up, finish as you would any other fabric repair: brush on Poly-brush, then spray on Poly-brush, then spray on Poly-spray, followed by light sanding and more Poly-spray. For the Poly-spray coats I applied material up to the edge of the previously chamfered sanded edges.
My airplane unfortunately has a PPG Durathane automotive paint finish, so I finish-coated with Durathane that was color-matched from the original paint. Feather the edges into the existing wing skin paint. Lastly get out the buffing tools and buff the repair, particularly the edges, to blend the repair into the existing finish. In the end the repair is noticeable if you look for it, but it does not leap out to the casual observer.
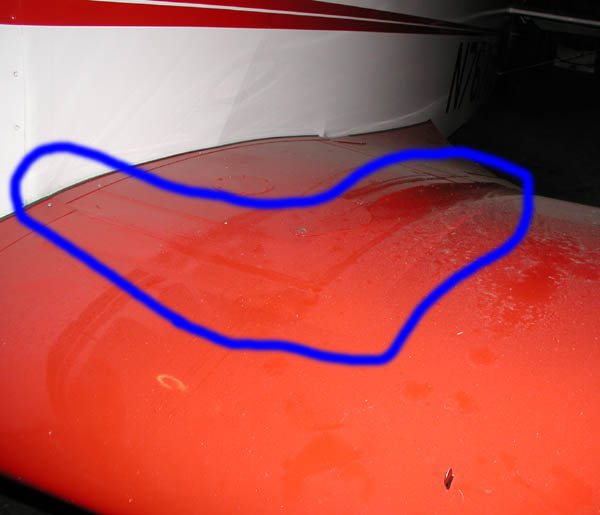
Unfortunately any fix using the original butt-joint tank cover seams is not going to last. Already my repair is showing bubbles under the new tapes, so someday it too will pop off. The area of the repair is circled in blue. This is before blending of the new paint, but after it was flown. If you look closely you can see the new crack/bubble that is starting to form.
I've heard that the only permanent fix is to remove the tapes and the tank cover, build a new tank cover, and then bond the tank cover into the wing skin using scarf joints. The scarf joints are very strong and will not flex like a butt joint will. That's more surgery than I'm willing to do for now, at least until the current tank tapes come off again.