Before buying my Ryan, I always thought it'd be fun to own and care for a polished airplane. They look great and attract a lot of attention. After having personal experience with polishing, I still think it is fun, but it is a lot of work. If you're not prepared to spend hours continuously polishing (or paying somebody else to do it), or you don't have a hangar, then you're better off with a painted bird.
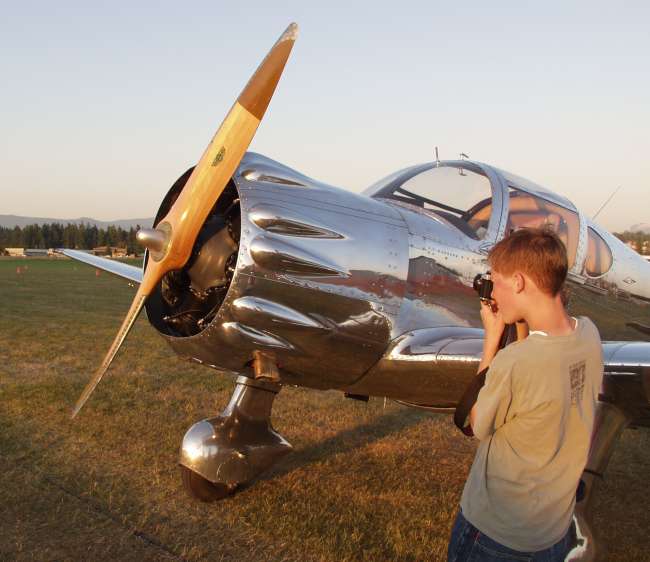
The surface of the Ryan is mirror-like, but it is not chromed. Rather the native aluminum of the skin and wings is polished to a mirror finish. This polished finish effectively resists corrosion and looks great, but the polish does slowly go away as the aluminum corrodes due to airborne moisture, thus necessitating steady re-polishing every 6 months or so.
The polished surface is really just a very smoothed-out surface of the metal without the very small pits or scratches normally found on most aluminum sheets. This is the opposite of a painted surface where you want at least some degree of surface scratching or roughness to give the paint something to grip - in fact when painting aluminum typically you intentionally rough up the fresh surface with a Scotchbrite pad and some acid etch. By contrast, the act of polishing smoothes out the metal and provides a small degree of work-hardening of the metal surface which helps resist scratching and corrosion. The smoother the finish gets the more uniformly light is reflected from the surface, hence the mirror effect. It is astonishing how well a human eye can distinguish the smoothness of the metal simply by looking at it.
I've been polishing for about 3 years and am still learning. There are still old corrosion pits on my plane which I haven't been able to completely smooth out. This page has polishing tips that work for me, distilled from initial guidance from a number of sources:
- PerfectPolish.com - vendor of polishing supplies.
- Shirley Manning's Airstream Trailer project website
- The Swift Museum Foundation polishing video - sold by PerfectPolish.com.
What's the Polish?
There are many type of polish available, but I have had great results with Nuvite Polish. Nuvite is a creamy substance designed for the aviation industry that comes in several different grades of coarseness. The very course grades are grittier than valve-grinding compound, ranging all the way down to finish polish which is smooth and creamy in consistency. The different grades I've used are:
- Nuvite G6: Very aggressive but good stuff for smoothing very visible pits and scratches.
- Nuvite F7: Aggressive but less so than G6.
- Nuvite C: Mid-grade, about the consistency of valve-grinding compound.
- Nuvite S: Finish polish.
Once the airplane is polished and in good condition, Nuvite S is all you'll need. To get it there you'll need at least grade C, and a sampling of all of the other grades is helpful.
Nuvite can be applied by hand but airplanes have a lot of surface area and power tools are called for. The tool of choice for finish polish is called a Cyclo, which is a dual headed random orbital polisher:
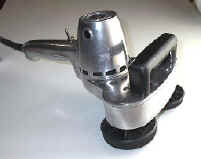
The benefit of the Cyclo is that it doesn't leave swirl marks in the metal if you're using the right polishing cloth technique (discussed below). The Cyclo is expensive but it is worth it.
To prepare metal for finishing, it is better to use a more aggressive rotary polisher or buffer, which can be made from a drill or purchased just for the purpose. Automotive body shops typically use the rotary buffer as made by Makita, Milwaukee, etc. These buffers work well for aggressive polishing out of pits and scratches, but they will leave swirls if used for finish polish. The Cyclo can be used without leaving scratch marks by even an inexperienced user.
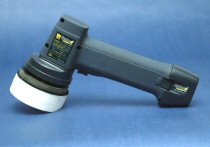
In 2005 there's a new handheld, rechargeable single head random orbital polisher being sold by Wen Corporation. This looks to be the answer to getting the polisher into small areas that the Cyclo can't reach.
I purchase my polish and polishing equipment from PerfectPolish.com, which is an online store operated out of Sonoma, California. Tom provides excellent customer service.
Keeping it Clean
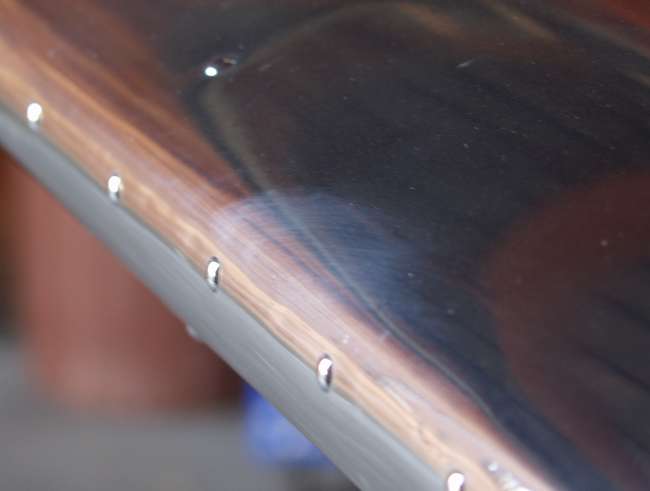
One of the biggest problems with a polished airplane is keeping it clean. Very fine scratches in the aluminum show up easily as gray clouds, and general dust and smashed bugs on the wings become a problem because removing them can cause those very fine scratches. Here's a photograph of where a bug was removed from the wing with only moderate pressure with a terry cloth towel. Notice the gray haze of scratches as compared to the surrounding metal:
The best thing I've found in 2005 to remove dust and bugs is to use a microfiber terry-style towel. These towels trap dirt within the fibers, as a result you can press nearly as hard as you like without scratching the metal. You simply can't do this with regular towels. The microfiber towels take off oil fairly well, and further they clean up in a washing machine. They're all around amazing, I recommend them heartily.
For bugs, I've been using Nu-Image from Nuvite. In the past I've used Glass Wax, but Glass Wax appears to be no longer available. The Nu-Image cleanup goo seems to have about the same consistency. Nu-Image is also effective at removing oil and exhaust residue. Wipe on with a microfiber towel, let dry, and then buff off with a clean microfiber.
For dust, a microfiber towel used dry works fairly well. The best solution is to wet down the surface with water and then wipe with a microfiber towel.
Whenever washing off dirt, or if your plane gets wet for some other reason such as rain or even dew, it is important to dry the surface properly. If you let the surface dry then water marks will form, and water marks are both highly visible and difficult to polish off. This happens for two reasons:
- The presence of the evaporating water accelerates corrosion of the aluminum
- The dissolved minerals in the water will be left on the aluminum surface as the water "carrier" evaporates, leaving a visible white "crust" or ring where the water droplet used to be. These minerals in solid form are very hard and adhere tightly to the aluminum.
To stop this from happening, it is very important to hand-dry the airplane whenever it gets wet. With Nuvite polish, if the plane is dried properly, the shine isn't significantly degraded even if the plane gets wet, in fact by removing the dust the shine can appear to be enhanced.
The biggest bummer with a freshly polished plane is being forced to fly through a rain shower due to ceilings or terrain. It cleans off the dust, but is also spots up the shine as the droplets dry in flight.
To hand dry, I use The Absorber which is an artificial chamois-like cloth sold in most auto-parts stores. Use it repeatedly to really dry the metal surface, wringing out the cloth when it becomes loaded with water.
I've heard from Sandy Blakenberg, who is the maven of polished aircraft, that Turtle Wax Bug and Tar Remover is good for removing built-up black polish from around rivets without marring the shine. I have a lot of built-up polish and the Bug Remover doesn't make much of a dent for me, but for less built-up rivets it looks like it would work well. The other technique I've heard is to use laquer thinner.
Basic Polishing Technique
Given a clean surface that has light scratches or haze, the only answer is to polish. This technique is essentially that of the Swift Foundation videotape.
Put a wool bonnet on the Cyclo polisher heads, and cover the wool bonnet with a terry cloth bonnet. More recently Tom at Perfect Polish has been recommending solid closed cell foam rather than the wool bonnets, but I haven't tried them yet. All of these are available from PerfectPolish.
The wool bonnets work for many polish passes as long as you keep them combed out with a wire brush. I use a spare welding brush to comb out the knots that form with polishing. The terry cloth bonnets wear out for me after about one entire pass around the airplane. It is important to keep brushing out the knots in the wool bonnets. I pre-emptively brush them out whenever changing polishing cloths (about 14 polish/buff passes).
Wrap the Cyclo with bonnets with a polishing cloth made from very soft cotton sweatshirt material. I use the material that PerfectPolish sells. The Cyclowraps pre-cut and pre-slitted polishing cloths are slightly more convenient than uncut cloth, but it doesn't make things much easier. The soft fuzzy side is placed on the metal, the rougher side towards the polisher heads. This is the reverse of most sweatshirts, which have the fuzzy side on the inside and the rougher side out.
Have a rolling cart or table to put the polish, polisher, cloths, etc on. Keep all cloths and equipment away from the floor. Unless your hangar has a sealed concrete floor, keeping the dust down is very hard so if possible elevate the tail when working on the fuselage. Dust on the cloths will scratch the metal so keep everything clean. I keep cleaned and discarded polishing cloths in separate lidded 5 gallon plastic buckets to keep dirt away.
Polish in a cool shaded location such as inside your hangar. If you polish in the sun the polish dries up too fast. I have found it best to have natural light, so I try to polish with the doors open during the daytime. The typically weak hangar lighting (e.g. single lightbulb) does not supply enough light to polish by. A portable halogen work light stand works reasonably well for evening polishing.
Make sure you keep the polisher cord away from the airplane. Dragging the dirty power cord over the airplane surface, even lightly, will leave scratches and rubber cord residue once to start to polish up the surface. While polishing, drape the cord over your shoulder away from the plane.
Polish by sections, about 1.5 feet by 1.5 feet (or equivalent) at a time. Working between bulkhead rivet lines or skin panels is convenient. Start a section by getting the cloth over the Cyclo heads, then applying a small amount of S grade polish with your fingertip to each head. Spread the polish by rubbing the covered polisher heads onto the section to be polished with the power off until there's a thin smear of polish near most of the surface of the section. Then make sure that the polish cloth is grasped tightly and turn on the power.
Work the polisher to get all parts of the section, moving about 1" per second and keeping the polisher heads as flat as possible on the metal. Try to apply the polisher to all parts of the section as evenly as possible. Avoid the temptation to focus on the edges of the panel and instead make sure that the proper time in spent in the middle of the panel. The edges will usually take care of themselves as they will be double or triple-polished due to section overlap. As the polisher works the polish will slowly turn a translucent black color. Then the polish will disappear as it is picked up by the cloth. This process should take about 1 minute on a reasonably fine surface. If it takes longer then you're probably using too much polish. Polish until almost all of the black is gone. The best polishing action happens at the end of the cycle.
The emphasis here is on small amount of polish, about as much as a dab of toothpaste (not a bead, a dab). Too much polish will just lubricate the polishing heads and waste time instead of polishing the metal. Too little polish will not turn uniformly black and you'll get uneven results. In practice it is far easier to have too much polish rather than too little, so when starting out use less polish than you think is necessary. You'll probably find you're still using too much even so, so try using less and see how it works for you.
Once the initial polish pass is completed, turn off the Cyclo. Move the polishing cloth to a fresh section, and then go back and buff the section without any polish to remove all of the black left over from the first pass. Pay particular attention to the area around and between rivet heads. If you don't get the black off now, it will be very hard to get off later. The buff pass goes faster than the polish pass.
After completing the buff pass usually the cloth will be gray but not caked with polish. You can use this gray section of cloth for the polish pass on the next skin section, so you get one polish and one buff pass out of each cloth "position".
If you see swirlies appearing in the polished metal, stop immediately and brush out the knots in the wool bonnets on the Cyclo. Here's an example of the swirlies:
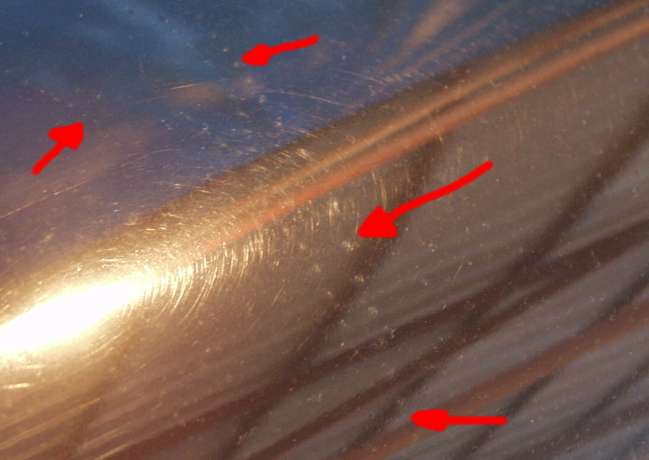
The wire brush applied to the Cyclo wool bonnets should remove the knots and you can continue to polish. The swirlies will polish back out with a repeat polish pass.
After the buff pass I then go over the section by hand with a microfiber cloth. This sucks up the residual polish left around rivet heads. You can really push hard with the microfiber without worrying about scratches.
Removing Gray Haze
For very fine scratches, such as those brought on by removing a smashed bug, the haze and scratches will polish out with an application of Nuvite S or fine-grade finish polish. Nuvite S will also remove water marks left over from dried water drops, but it takes a lot more work and may take several applications of polish.
My aircraft originally had not been polished for several years, and it appears that at some point the aircraft was painted before it was eventually stripped for re-polishing. I originally polished the plane with Nuvite S, and while it shined up there was a persistent gray haze in the background of the finish. This haze was impervious to further polishing with the S grade.
Upon closer examination, this haze appeared to be very fine corrosion pits in the metal. I have found that the only way to remove the haze is to be cruel to the metal and use the more aggressive cutting grades of polish to smooth out the pits. Unfortunately this also scratches up the shine quite noticeably, which is a difficult thing to take after having spent hours polishing up the shine. It really does come out in the end, though, so grit your teeth and do it.
I have used Nuvite both G6 and F7 with the Cyclo polisher to take out the gray haze, and then have follow with an application of followed by one or more passes with S. I found G6 to be the most effective. After the harsh step, build up the shine again with repeated passes of progressively finer grades of polish. The result is removal of haze and a "deeper" mirror shine. One my plane, results were uneven showing where some sections of the metal received more polishing attention that others, so repeated applications are necessary.
I've had more luck using the compounder with Grade F7 polish, per the technique recommended by PerfectPolish.com. It really does work. The learning for me is that you have to be really mean to the metal in order to get the pits polished out. After compounding if you roll the airplane out into the sun you'll cry due to all the scratches, but those scratches will come out with Cyclo'ing. The result is much better than when you started and it takes away the grey haze. I've got a lot more compounding to do!