Becker AR4201 COM Radio
Reviewed 1/20/2001
In upgrading the radios in my Cessna Airmaster, I needed a new radio but had
to deal with an extreme lack of panel space. The Airmaster has no room to
hang a standard-sized radio underneath the panel, and it also doesn't have much
depth available due to an oil tank located behind the firewall. I did have
a 2.25" round cutout available on the panel.
 There are two small radios that fit
the micro-sized panel mounted category. The smallest is
actually the Microair 760. The
Microair is a good looking unit, however it is not TSO'ed which
will make installation in a certified aircraft difficult. The Microair
front panel interface is also a bit clunky in my opinion. The other choice
is the Becker AR4201, which is
certified, but longer in depth than the the Microair.
There are two small radios that fit
the micro-sized panel mounted category. The smallest is
actually the Microair 760. The
Microair is a good looking unit, however it is not TSO'ed which
will make installation in a certified aircraft difficult. The Microair
front panel interface is also a bit clunky in my opinion. The other choice
is the Becker AR4201, which is
certified, but longer in depth than the the Microair.
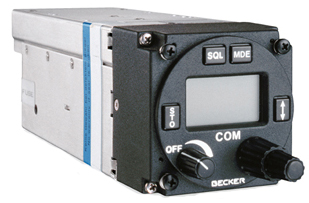
Physical Characteristics
The Becker unit is well-built and solid. It shows its European roots by
using metric-sized through-screws to bolt to the panel. The data connector is located on the back of
the unit and uses a standard DB-25 size, which is good. The connector also
uses slide-bar locking of a unique style, which is bad. If you buy the
radio new from Becker, the connector/backshell assembly supplied by Becker fits
and locks very nicely. Unfortunately I bought my unit used and it did not
include the connector. Buyer beware. It is probably possible to
convert the unit to use lock screws to secure the connector, but this would
require disassembling the unit. That was more trouble than I wanted to get
into so I just called Becker to order an additional connector/backshell
assembly.
For depth-restricted installations, the data and power connector is located
in a stepped-in section on the lower rear of the unit, so much of the connector
backshell does not protrude beyond the rear of the radio case. The antenna
BNC connector is not located in the stepped-in area, though, so if you're
worried about depth you should add an allowance for a right-angle BNC connector.
Installation
Installation was relatively easy. The install instructions and wiring
diagrams are clear except for how to deal with dynamic vs. standard microphone
wiring. The two types are wired differently to deal with the different
levels of mic bias voltages required. Becker could also improve their
instructions by providing a diagram that shows connections to a standard
US-style intercom. They show connections to a Becker intercom but the
diagram uses non-standard nomenclature and it is mostly focused on what pins to
connect to on Becker's proprietary connector layout.
The AR4201 supports separate ground lines for radio and mic grounds, but it
works fine in a common-ground wiring scheme. I did not use the built-in
intercom feature but the Becker does support it.
The installation and operation manual is obviously a translation from the
original German, but it is readable. It is annoying that the manual is
supplied on A4-sized paper which will not fit into a US-sized notebook or
binder.
One intriguing feature is that the Becker supports RS-232 interfaces to
control the unit remotely. The data formats are documented in the manual.
This feature could be used to set up a headless avionics system controlled by a
unified glass cockpit display, although for an experimental aircraft the
Microair might be a better choice due to smaller size and lower cost. The
Microair also supports the remote control feature via RS-232.
Operation
The radio operates like most any COM radio with standby tuning. It uses
intuitive concentric knobs to tune the standby channel, which is selected as the
active channel by pressing a active/standby swap button. Power and volume
are on the other knob. Squelch is automatic and can be overridden with a
front panel push button. The squelch threshold is a programmable setting
accessed from the configuration mode.
The display screen is a standard calculator-style passive LCD screen with
backlighting. To simplify wiring and switches I wired the installation so
that the backlighting is always on when the avionics master is on, but it could
just as easily be connected to a panel lighting dimmer. Readability of the
display is adequate but not great, and off-axis viewing is relatively poor
especially in the vertical plane. Make sure you can read the unit if you
plan to mount it in an unusual location - angling of the mount may be necessary.
The AR4201 has several display modes and can be configured to show either the
standby channel, the input voltage, or the outside temperature if an optional
temperature probe is connected.
Memory channels are available and are useful for commonly selected ATIS,
tower and ground frequencies. Memory channels are recalled by changing the
mode and scrolling through a set of stored choices indicated by number.
Programming is relatively easy and is accessible in flight by hitting the store
button and selecting a storage "channel", which stores the active frequency.
Other settings of the AR4201 are software programmable, such as sidetone
volume and squelch break sensitivity. These settings are accessed from a
configuration mode that is not designed to be used in flight. While
software programming is a big step up from trimmer pots located on the back case
of the unit, the programming interface still leaves something to be desired in
usability. You need the manual to be able to understand it. Avionics
manufacturers could learn something from cell phone manufacturers like Nokia in
terms of setting up a relatively easy user interface.