Here's a list of tools that you might need. The list will vary for different types of engines, and this list is for the Continental O-470. For tools that are unique to the engine, you should consult the engine overhaul manual. Note that the overhaul manual will often list many special and highly expensive tools that the factory uses but that you don't need to complete an overhaul.
If you're working with a mechanic, chances are the mechanic already has these tools and through negotiation you can use your mechanic's tools. Make sure you respect your mechanic's tools.
As somebody who does a lot of maintenance, I have a policy that whenever I need to use one of my mechanic's tools then I buy one for myself. This isn't always practical, but works well for most tools.
Hand Tools
General hand tools: You'll need the following (all in fractional inch sizes - no metric). I recommend the high-quality full polish Craftsman or Snap-On tools.
- Short-pattern "stubby" box-end wrench set, 1/4" to 3/4"
- Long-pattern box-end wrench set, up to 1" size
- 60 degree double-offset box-end short-pattern wrench set (Snap-On makes an excellent set, and they're sometimes necessary for tight fits).
- X-Acto knife, angle blades and flat blades for gasket scraping.
- Cotter key puller tool
- Duckbill and needlenose pliers
- Small set of snips
- Crescent F-wrench with 2" capacity
- 1/4" drive 12 pt shallow socket set and drivers, with extension set
- 3/8" drive 12 pt shallow socket set and drivers, with extension set
- Assorted screwdrivers
- Allen key set
- Brass hammer
- Soft mallet
- Cleaning brushes
- Drifts of various sizes to help with assembly
You might also find yourself in need of deep sockets and/or universal drive sockets, depending on the engine.
You must have a good, calibrated, torque wrench for any overhaul. I prefer the "clicker" type of torque wrench where you pre-set a torque value and then turn until the wrench "clicks" off at that specified value. The clicker types are more expensive than the beam type wrenches where you read the torque off of a scale attached to the wrench. Both work equally well assuming the wrench has been calibrated.
You'll typically want a small and a large wrench for convenience. A small wrench is best for the smaller jobs and tight clearances, and it is lighter. A large wrench is handy for leverage when doing the larger torque values like through-studs. Your wrenches should have a range of about 50 inch-lbs up to about 800 inch-lbs.
Specialty Tools
There are a number of specialty tools that are required for any given aviation engine. Many of these tools have use in regular maintenance outside of overhauls, so they're handy to have around all the time.
I recommend these suppliers:
Aviation spark plug socket. You need a special socket for aviation plugs. Make sure you have adapters for your torque wrench's drive size.
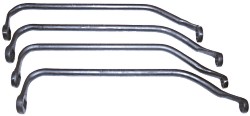
Cylinder base wrench set. These wrenches are strangely bent to allow you to get to the cylinder base nuts when the cylinders are installed on the engine. There are different sizes required for different engines so make sure you check sizes.
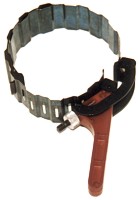
Piston Ring Compressor. I recommend the wrinkle-band type. Make sure you get one large enough for your engine. Many automotive compressors are not large enough for aircraft pistons.
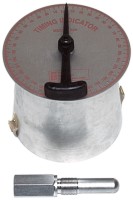
Timing disk and propeller dome adapter, and magneto timing box. To set timing on the engine after reassembly.

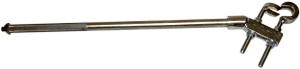
Pushrod Tube Spring Compressor. Necessary when installing Continental engine pushrod housings.
Valve spring compressor. If you're doing top end work, you should get this specialty compressor tool.
Bearing puller. Might be necessary for disassembling accessory drives.
Engine crane. Get a portable hydraulic shop crane from your local auto parts store. Usually these come in a 2 ton capacity and can often by found with folding legs to make storage easier.
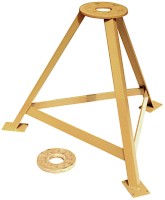
Engine stand. Check Trade-A-Plane for engine stand ads. Do not attempt an overhaul without a stand. You should also get the rolling casters so that you can move the engine around during the overhaul.
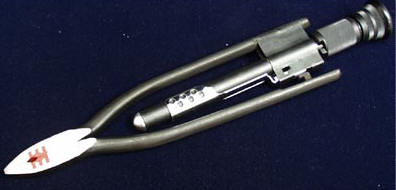
Safety wire twister pliers. I recommend getting a good set of twisters, not a cheapo import. Robinson and Milbar are the best. I particularly recommend the Milbar Tigerwave 6" and 9" twisters.
Measuring tools. You're generally going to need:
| Outside Micrometers. A good mix is 0-1" and 1-2" fixed, and a 0-6" interchangable anvil set. |
|
| Snap-gauges, buy a set up to about 6 inches. |
|
| Bore gauge, up to 6". |
|
| Caliper |
 |
I prefer direct digital-reading equipment to minimize confusion, but that costs more than the old style analog gauges and both work equally well. Mitutoyu Digimatic or Starrett are good brands. McMaster-Carr is a good supplier.
Documentation
You will absolutely need a copy of the engine overhaul manual and the parts manual. The best source for these is the factory. Continental sells copies online via their website.
You should also have a copy of the latest service bulletins for the engine, also available from the factory.
While you are removing your engine and disassembling it, make sure you document the existing installation. I recommend a decent digital camera for convenience. Having the photos provides for a record both during reassembly and useful documentation of the engine's previous condition and its overhauled state that you should include with the engine records.
Supplies
Get a bunch of plastic ziplock bags and 3x5 index cards to bag and tag parts as you remove them. I buy the sandwich size and the 1 gallon freezer-bag size.
Aero grade Hylomar. Gasket and parting seam sealant. Great stuff.
Safety wire. You'll need 0.020, 0.032, and 0.041" stainless steel safety wire.
Fuellube. An all-purpose lubricant useful when assembling fittings.
Parker O-Lube. For lubricating O-rings during assembly.
Assembly lube. I use Hyper-Lube Assembly Lube right out of the bottle (available at auto parts stores). You can also use fresh 50 weight oil.
Specialty lubes. Certain parts may require specialty lubes during assembly. Consult your overhaul manual.
Silicon Baffle seal material. You'll need several feet of baffle seat material. I recommend the silicon fiber-reinforced variety. You'll probably also need attachment rivets and backing washers.
Miscellaneous Hardware. You should decide whether you're going to replace small hardware items such as screws, nuts, washers, and bolts. If so, you will need to get replacements.
Engine paint. I recommend Randolph engine enamels. Make sure you also buy some solvent/reducer for spray dilution and cleanup. If you're looking for a brighter, non-stock engine color (e.g. red or blue to match your airplane) then I recommend Bill Hirsch engine paint, which is good stuff but doesn't come in "aircraft" colors. The Hirsch paints thin with Xylene.
Wicks or Aircraft Spruce are good suppliers for the miscellaneous stuff.
Installation and Test Run
You'll need a pre-oiling rig to pre-oil the engine before it is run for the first time. This can be as simple as a pressure tank with two taps and valves. You fill the tank with oil, attach an outflow hose to one tap and connect the hose to the engine. You connect compressed air to the other tap to pressurize the tank and force the oil into the engine oil galleries and bearings.